Friday, January 23, 2009

Ever wondered?...

So how or why is it paper beads are made with different shapes?
It ALL lies in the shape of the paper. There are 5 shapes on the left. The 1st shape is the traditional paper bead. The remaining 4 are the variations you will need to cut the paper in order to make a bead of the respective shape.
Inventing and playing around with paper shapes will give you beads of all size and shapes.


These are some of my own inventions of various shapes ;)


Wednesday, January 21, 2009

Swallow my pride series


My new swallow earring series. You can look forward to more shades and colors really soon in my Etsy shop :)

Recycled Paper Beads - Tutorial

This is a brief tutorial. The concept is there but they way i make my own paper beads differs slightly in materials and method detail.

In Victorian times, women in England gathered in dining rooms to make beads by rolling scraps of wallpaper on knitting needles. They would then string the beads on long pieces of yarn to create curtains that separated rooms. You can make these beads from recycled scrap paper, and string them together to make jewelry!


What you'll need:


-scraps of wallpaper, magazine pictures, used wrapping paper, colored paper, etc.


-pencil, ruler, and scissors


-paste


-drinking straws

-thread or yarn


Before you begin, gather all of your supplies together and put them on your work surface. Read all of the directions from start to finish. Now you are ready to begin.
With your scissors, cut long triangles from your paper scraps that are about 1/2-inch wide and 2 1/2-inches long. Make a template to trace, if you wish.
Cover one side of a triangle with paste. Put the paste on the inside of the paper so that the colorful pattern will be on the outside of your bead.
Place the triangle's glued short side on a drinking straw.
Wrap the paper completely around itself on the straw.
Cut away the straw at both ends of the rolled paper.
To make beads with different shapes, vary the size and shape of the paper triangles that you cut.
Let your beads dry, and then string them together on your thread or yarn. Knot the ends of the thread together.


Adapted from Papercrafts Around the World, by Phyllis and Noel Fiarotta(Sterlilng Publishing Co., Inc., New York)

Tuesday, January 20, 2009

Monday, January 19, 2009

A proud mother.


Muahahaha *insane laughter* I feel like a proud mother. I sold these beads earlier this month to another etsy member. Today they were reborn as a pair of elegant earrings! A crafter's joy is to see their craft used and enjoyed by someone else, busterandboo is certainly sending my little beads along their way. Its also a great example of how paperbeads can be used, I hope it serves as inspiration to all the crafters out there.

Please visit her shop below to see more pics of the pair of earrings above. She's got some lovely stuff so i think you'll be stuck in her shop for some time :)

Busterandboo's Shop : http://www.etsy.com/shop.php?user_id=5486148

Busterandboo's earring section: http://www.etsy.com/shop.php?user_id=5486148&section_id=5575527

Sunday, January 18, 2009

Someone was waiting for me! O.O

Hey! Look at all my little candies lol!

I know! I just made my post below and it hardly has had time for people to read! But i was just on Etsy forums answering a thread and i just had to make this new post.

The thread title was "Paper used in earrings" (broad smile..) Of course i had to poke my head in haha.

What really made my day was that the thread poster actually already came to my blog and knew i was going to post about what you can use to make paper water resistant! How can i keep them waiting? So here it is...

I cant water proof paper. I can only make it water resistant. There is a difference, simply speaking... if i said my beads are waterproof you should have no worries scuba diving with them. Being water resistant on the other hand means that they are resistant to rain, washing hands, snow... etc etc...

You can make paper waterproof by using a wide selection of gloss and sealant that you can find at any D.I.Y or craft shop. Just make sure that on the bottle it says that it is water resistant or for outdoor use and that can be used on paper. I also prefer to use the ones that say "non toxic" or "eco friendly"

Just like a photograph, you have to decide if your paper is to look glossy or matt. If you like matt finishes you can use decoupage finish. If you like the glossy look just pic something that says it will give a gloss effect. All my beads and accessories are coated with gloss finish.

Alot about making paper water resistant is NOT dependent on the gloss itself. Below are some important tips to note.

  • - A whole lot of things are trial and error... there's a million types of gloss, varnish, paper, coloring, ink..... out there that can give different results.

  • - Always brush on the coating, never dip your paper. Dipping makes the coating too thick and tends to drip.

  • - Wait for each coat to dry. You may wish to apply 1, 3, or 100 coats. Whatever its is.. let your paper dry properly before applying another coat on top.

  • - If you have modular pieces. Like my blue roses in the post below, each rose is made up of 3 different pieces of paper and then assembles together. Please coat each piece of paper separately.

  • -If you don't want to make your paper stiff.... but you just want it to be water resistant, just wax it with a candle before you start folding it :) The paper will still remain soft that way.

I might add on to this post if i think of more. If there's any particular thing you wish to know, just ask. I'm no expert but i'll help if i can

The Midnight Rose


Good morning :) This is my new creation. A set of origami rose bobby pins. The full description in my Etsy shop.
If you look to the left of my blog. You'll also find a new poll. Please help me out by voting for what you'd like to see more off.
Thanks
Ivy

Thursday, January 15, 2009

Can you make origami waterproof?


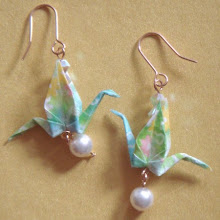
Someone saw my paper cranes earrings and asked me on Twitter : " Is there a way to make them waterproof? "
First of all i would like to tell the world that (takes a deep breath and screams!) "All my items on Etsy ARE water resistant!" haha.
Ok now to tackle the question.....
Yes There is a way to make origami pieces water resistant. People want to do this for a number of reasons.
  • - To protect their masterpiece origami pieces. (i understand how you'd feel if someone spilled water on your masterpiece)

  • To make a piece weather resistant. This applies heavily for my case. I turn paper into craft and jewelry pieces i hope someone will wear and treat like any of their other accessories. I don't expect you to go scuba diving with my beads, but they must function fine under the rain, snow... tap (i wash my hands with paper bead bracelets on all the time).

  • - Gloss and glue are used to make a piece of origami resistant to water. They also give the paper some hardness. Depending on the number of layers and type of gloss you apply you can make a piece totally stiff and unbebdable or in the case of these paper earring you can move the wings, head, tail but only with a little pressure.

  • - Standing origami. Sometimes a piece of origami looks great but your crane or horse or dragon cant stand upright on its own. Using something to harden up the paper a little may help with this. Not all the time but it may allow you to display your structure upright.

As to how exactly to coat a piece and with what type of glue/gloss, stay tuned in my next post. I don't want to type a whole chapter each time i make a blog post haha.

Wednesday, January 14, 2009

1 million things...(an intro to origami)


I have so many things i want to say now that i have started this blog! Man where do i start?!

My love of paper crafts started from origami. Origami is the Japanese art of paper folding. Here it is often taught in art class to primary school children. But there is more then the typical paper crane out there. Artists like Satoshi KAMIYA work on inventing new origami, like Mr dragon here. I heard it took him 30 hours to fold. There are many varieties of origami folding and the type i like most are the type that look the most life like. I like it when paper is manipulated until it is no longer flat, no longer having sharp edges... almost
as if it were moudable putty. I like it when paper "flows".

What consists a good piece of origami?

- Distinct features and sharp lines and folds.

- The meeting lines of the paper and of the folds should not show of the white underside of the paper. The fold should meet exactly. Origami is like architecture, it is a precise art. If you start off with a piece of paper that is not an exact square or rectangle, you will not make the perfect piece. It is the same if you make a sloppy fold that does not meet edge to edge. This is how i tell the quality of a piece.

-Representation: This also has to do with the point above. A finished piece should look like whatever it is trying to represent. If you fold a crane, it should not look like a hummingbird or a swan.... it should look to the first person who sees it a crane. If it doesn't, either the origami diagram was ill invented or it was simply the folding technique.

If you would like to try your hand on origami, i recommend this site.

http://dev.origami.com/diagram.cfm

There are hundreds of diagrams to try from the very basic to the rather tough.

A Simple Example

Paper Crane Dangle Earrings, Kimono Green


This is just a simple example of how the beads and charms i make can be used to make jewelry.

Fallen Leaves

Origami Leaf Head Pins - (1 pair) Japanese, Reddish Pink Floral


Actually i don't know what to call these. I didn't want to loop up the end wire to make this piece into a pendant, i wanted to leave it just the way you see it now so that people can turn them into hair clips/brooches,earring, necklace.... anything! In the end i called them head pins. If you have any idea how else i should name them pls let me know.

On the 1st day...


Phew! setting up a blog is no easy task for the likes of me but I’ve been putting this off for way to long. Typical me... i start a blog and the 1st thing I do? .... add gadgets lol.

Anyway, thought I’d give an idea about what this bloggy is in my 1st post. It says a little bit in my profile I know but here's a little more detail.

I've been the crafty kind for as long as i know. This is the 1st time I'm doing alot of things other then store my crafts. The 1st time I'm selling them online at Etsy, the 1st time i'm blogging too. How's it going so far? Hard to tell. Selling doesn't seam as easy as i thought though. I made 1 sale on the 2nd day of my 1st listing at etsy and everyone was amazed. And then nothing till now.
MyPaperEden is a shop that sells paper supplies and jewelry. Alot of people see my works and start to ask me a whole bunch of questions because they have never seen the stuff i make before or even knew that they existed. 1 of the reasons of this bloggy is to answer all these questions. In future posts you can expect to see my new creations as well as explanations about them and how i create them.

Well, that enough for a start :) here are some of the beads, charms and jewelry I've made recently. I hope you like them.